Thursday, December 5, 2013

Christmas Survival Box

Every year we travel to about 5 different homes during the holiday season for family Christmas'. Each home we travel to means the boys will be getting gifts to celebrate the season and with most children's gifts we encounter the Fort Knox of zip ties, wire twist ties and other impenetrable plastic pieces. Usually we can distract the kids with some other toy that isn't so difficult to get into but then that toy needs batteries and if someone thought of the batteries, we will be at a location that does not have a screw driver. I can go on, but if you have children you know the hoops you have to go through to get the gifts open. This year I decided that we will be prepared and come with a collection of things to keep our sanity.

You can pack yourself one now and have it ready to toss in the car or in the kitchen for Christmas morning. I was able to collect everything from what I already had in the house and I am sure you have many of the items yourself (if not a trip to the local dollar store will get you most of your supplies for a low cost).


Christmas Survival Box Contents:
  • Notebook and Pen   For recording who gave what, makes Thank you's so much easier!
  • Batteries of all sizes
  • A standard and Phillips head screw driver I have a pretty small one because I have found the screws to be usually small on the kids toys
  • Plastic snack size baggies For those really small parts, especially if there are babies at the gathering, those can be played with at home.
  • Garbage Bag
  • Masking Tape If more than one child is there, it helps to label toys so when it is time to leave you know you have your child's new gifts
  • Wire Cutters, Scissors and a Scotch Brand wrapping cutter The tools of the trade for those wire ties and plastic clam shells
  • Baby Wipes  I honestly never go anywhere without these so I packed them in here too
  • Last buy not least - Advil!! The toys, the in-laws, the sugared up preschoolers - take your pick, you will be glad you packed it. 

This is my survival box, what would you include in yours? Did I leave anything out that would be helpful? Please feel free to comment and let us know. Maybe your idea will help others have a Merry Christmas without the stress.

Sunday, June 9, 2013

Tourist In Your Own Town - Midland

Are we theeeeerrrre yet? How much longer?
Four potty-stops later, three sibling tantrums — the reality of road-trips is often two weary parents and frazzled kids before the “fun” can even begin. There’s no need to hassle! Quality family-time is easy to achieve right in our Great Lakes Bay Region! Take a second look at your surroundings…BE A TOURIST IN YOUR OWN TOWN!

Explore the outdoors in Midland!


Midland always has something going on downtown and parking is usually easy down by the Tridge. Saturday mornings can be a bit tricky but if you are going to the farmers market, heading up to main street for shopping or just enjoying a walk on the rail trail, parking is available behind the courthouse (the large lot to the right of the hotel) if the main lot is full. Thursdays you can enjoy Tunes By The Tridge in the evening and as mentioned before Saturday morning is a great time to start your adventure at the Farmers Market. Many weekends the downtown area is host to an event from a chili cookoff to a classic car show. For more information please visit the event page for a specific weekend.
http://www.downtownmidland.com/events/
t
One block up from main street and you will find Ray's Bike Shop. Ray's offers an unique option for touring the rail trail and around town, the surrey. They offer rentals from their fleet of comfort bikes, surreys, and pedi cabs along with a knowledgeable staff to help you find just what you need for your own bicycle travels. Outside Ray's you will find a large troll standing guard. He means you no harm and is a sculpture from a few years ago.

Downtown Midland Facebook Page
To see this years Larger than Life sculptures just head up to the main street and begin exploring.The art exhibit will be on display from June 5th to September 19th. Walking (or peddling) up and down the few downtown blocks you will smell the sweet aroma of Heather and Holly with their tasty sweet treats. Chocolate covered potato chips or perhaps some caramel corn anyone? If your feeling hungry Pizza Sams has a wonderful menu that includes salads, pizza and ice cream. The kids can even watch their pizza being made by standing on some stairs that are prime viewing seats for your little chef. Down the hall way is The Coyer Candle Co Shop  so mom can have a nice treat too.

Once you have enjoyed downtown head back to the Tridge area for the Rail Trail. The Midland section of the Rail Trail begins at the base of one side of the Tridge. You will note a MID 0 marker, indicating the start. At the start of the trail you can stop at a splash pad to cool off. Continue down the trail and view the river, beautiful landscaping of the homes, and just enjoy the outdoors. About one mile down the trail is Emerson Park. A great place for a break with the fish slide, picnic tables, and porta potty restrooms. Across the street from the trail you can see Daliha Hill, full bloom in August. Further down, about 2 miles from the Tridge, is The Midland County Historical Society Museum. The trail does continue 30 miles, all the way to Claire, so you have plenty of walking space to tire your little ones out.


Chippewa Nature Center and Homestead Farm is our go to place on Sundays. While you can go any day during the week and enjoy the trails and animals of the homestead farm, Sunday is the day the buildings are open and staff is on hand to help with questions about the buildings from 1;30 to 5pm.. The farm has cows, pigs, sheep and chickens as well as a vegetable garden. A school house, house and sugar house are located on the property. The trails go through the woods and offer a great way to explore nature with your budding scientists and historians. Pack a lunch and walk the grounds for an all day adventure in the great outdoors.


Dow Gardens
Dow Gardens offers a great day trip adventure for a very reasonable cost. For $5 per adult you can enjoy the beautiful flowers, ponds, bridges and childrens garden. If you think you will be back more than once (and I think if you live in the area you will) the $10 yearly pass is sure worth the price. Walk the trails, take wonderful pictures, play in the water at the fountain in the Children's Garden, you will be sure to spend a few hours here so pack a lunch.

Whiting Forest
After lunch you can walk over to the Midland Center For The Arts. A new exhibit is offered through out the year along with the Hall Of Ideas. After spending some time here drive down the road to Whiting Forest. Your Dow Gardens ticket/card will allow you access to the 2 miles of hiking trails and forts! That is right, through out the grounds is quite a few forts built by local businesses to climb on  and explore. With houses, castle and one that you can build yourself you can see your child's imagination come to life.


Be a tourist in your own town. Midland is full of fun and active things to do outdoors with your family.

Thursday, April 11, 2013

A Tourist In Your Own Town

I moved to Bay City in 2005 and then to Midland in 2007 and in the 8 years I have lived here I have not taken advantage of all the fun stuff there is to do in the Great Lakes Bay Region. I kept telling myself that I would visit a place sometime but that sometime never came. The idea that a location is always available to me keeps it from being a priority. This year we are making a list of all the things we can do right in our back yard (within a 30 min drive) and when the kids are bored or we want to get "away", we are going to be a tourist right here in the Great Lakes Bay Region.

Our list had a few factors to be considered and should not be your only options for checking out what this great region has to offer. Our consideration had to made on the fact that I would be taking 3 pre-schoolers to many locations by myself. My husband works 3rds shift and so he is asleep from 8am -3pm everyday. The places we would visit have to allow interaction of the environment, somewhat contained environment, and places to rest because walking on such little legs can be difficult. If your children are older, there may be more to add to the list but our list is based on the ages of our children and attention spans.

Midland area:
Dow Gardens -  So much to do and if you go more than twice a season purchase the $10 pass.
Whiting Forest - Part of Dow Gardens but also has forts in the woods!!!
Chippewa Nature Center
Midland City Forest
Captain Dave's Entertainment Center : roller skating and arcade for those rainy days
Dahlia Hill : this is in bloom in August and near our favorite park
Loons Stadium : I can't believe we have never gone to a game!!
Heritage Park : Right off from the rail trail. The boys may not care too much about the old homes so we will also walk the trail.
Lost Pirates Adventure Golf : Putt Putt Golf and Bowling all indoors.
Midland Center For The Arts : The Hall of Ideas and many events year round
Midland Community Center : 2 pools and a splash pad? what else can you ask for in summer fun
Rail Trail : Many parks and things to do off this trail. We walk it every year and love that I don't have to worry about cars for my little men.
Pine Haven Recreation Area : I ran/walked this trail last year and let me tell you those hills will wear those kids out!
Sanford Centennial Museum : again who knows if the boys will like it but they can see a train!!
Sandford Lake : One of the first places I went when I moved here and haven't been back because it was always there. With water I will have to make sure I have someone else with me to keep an eye on the kids. 
Stratford Woods Park : We have heard good things about the shallow lake for swimming. 


Wednesday, March 20, 2013

Grossology at the MCFTA

When I was 10 years old my grandfather gave me a book that had plastic vomit on the cover. It was so gross but I had to read it. I read it cover to cover that night and became a fountain of knowledge for all the disgusting (but natural and normal) things our bodies did. Much later, a few more grossology books were written and since I had much younger siblings, at the age of 20, I was learning again about more things our bodies do and what animals did as well. It was amusing to me but not as amusing as it was to my brother at the age of 8.


I had such a love for these books and how they brought a smile on a young kid's face who were learning in such a fun way.  I was very excited when I received my brochure that showed all the 
fun things MCFTA has to offer through the year and this was staring back at me:

It took some time for us to make it and see the exhibit, but we finally made it today. I packed up our 4,3 and 2 year old and headed out. The experience got some mixed reviews. Here are some things to know about this display before you go.

What is the cost?
 The cost is $9 for adults and $6 for children 4 and older. Under 4 is free. This gives you admission to the Grossology exhibit and The Hall of Ideas. If you have been to the MCFTA before December 2012, note that a renovation was done and things have been updated and fixed.

When can we go?
The museum is open
Wed. – Sat. • 10 am – 4 pm
Thurs. • until 8 pm
Sun. • 1 – 5 pm
CLOSED Mon., Tues.& major holidays


On Thursday March 28th Great Lakes Bay Moms is having a family event that will offer reduced pricing. 

 Who is going to enjoy this?
I was sure my boys would love this because they were boys and it was gross. 2 of them did enjoy the interactive play but my 3 year old was frightened by the noise and large animatronic people. When we were there a lot of schools were doing field trips. I would guess the children were ages 7-11 both boys and girls alike enjoyed every inch of the exhibit.

I don't want to discourage any parent from bringing their child to Grossology because I did see some small children having fun but I can also see why my 3 year old was not happy. To him walking through a large mouth, seeing plastic dolls that were 3-4 times his size start moving and having all the noise around him was a sensory over load. If your child has no issues with these things, then I say they will enjoy it because my 2 and 4 year old didn't want to leave.

Is the MCFTA difficult to find?
If you are coming from out of town, Midland can be a bit difficult to navigate in some areas. The Midland Center For The Arts, however is located near freeways and main roads making it pretty easy to find. It also shares a parking lot with Dow Gardens.

What will we do/see?
 There are many interactive displays that show how the human body works. This is done in very silly, fun but educational ways. Some things include going into a digestive track and pretending to be a piece of food on a intestine slide. Climbing on warts, zits, scabs and other skin blemishes. Helping the kidneys out by playing a game where you grab unwanted particles (similar to a Kinect gaming system). Pumping large amounts of soda into a 4 foot head to make them burp and more. Representations of how much urine, mucus and other bodily functions are displayed as well.

Monday, March 18, 2013

Jack's Birth Story

Everyone has their own birth story. Some are picture perfect and some are very trying but most are somewhere in between. If you feel your OBGYN is not the perfect fit don't be afraid to change medical professionals. Great Lakes Bay Moms has compiled a list of OBGYN, Midwives and Doulas for you to choose from. 
 
My first born son's entrance into the world was nothing like I thought it would be. I watched TLC's A Birth Story and I was 14-10 years older than my siblings. I knew that I wouldn't know the exact time he would be coming into this world and that it wouldn't happen quickly. I could only plan as much as I could and wait.

At my 30 week prenatal appointment things started to change. They were noticing my ankles were swelling and protein was being detected in my urine. Since I was overweight before my pregnancy the big concern was always gestational diabetes but this was a new concern. Nothing was said to me at this point, I was just told to get a container from the lab and collect my urine for 3 days for testing. I did and when I went back for my 32nd week appointment the concern was made clear. The doctor informed me that I had pre-eclampsia. I was instructed to look it up online because our time was running short. Lets just say going online to look up any sort of medical advice is not the best thing to do. I was sure I was going to die within the week and started to panic.

We had some non-stress tests scheduled (a monitor is put on your stomach and the baby's heart rate is watched) for the next few weeks. I was at the doctors office 3 times a week from 32 weeks to 35 weeks. Nothing changed much so I was just monitored.

When I arrived to my 36 week appointment I did the normal urine test, blood pressure test and had my weight charted. I couldn't tell what was going on but the nurses and doctors seemed concerned. I was asked to lay on my side and in a short time a nurse would be in to take my blood pressure again. After 2 minutes another doctor, my doctor and a nurse were waiting with a wheel chair. I was informed that there was protein in my urine at high levels and that I was to have the baby that day. The nurse pushed me up to the maternity ward and my husband rushed home to get a bag packed and to inform my family I would not be present at my baby shower scheduled for the next day.

When I was upstairs I was told that my kidneys were shutting down and they needed to induce me. Some sort of medical strip was placed on my cervix to try to thin it and induce labor. For about 3 hours I waited for something, anything to happen. Then I saw a group of doctors in the doorway whispering. My doctor held his head low and seemed to not want to talk to me. After a few minutes he came in and said they had made a mistake. I couldn't be induced that day because I was not considered full term. Now the strip needed to be removed and I was to stay in the hospital for 3 more days to be full term and they would try again. I cried.... I was beside myself and full of anger that I would be taken on such an emotional roller coaster was my first thought. My second thought was to get this man who called himself a doctor as far away from me as possible. Through out the night I was monitored and spoke to many doctors and nurses.

The next morning the OBGYN on staff came in and spoke a bit about what was going on. I explained my side of the story and how I felt. It was mentioned that I could have a c-section because of the stress and obvious health concern of pre-eclampsia. The risks of giving birth and having a c-section were given to me. After some consideration I decided the c-section only put me at risk and trying to wait for a natural birth put two lives at risk. I choose the c-section. The nurse who had been very nice up to this point, decided to make her plea. She explained that she would never have a c-section and that I should at least try the other way first. I declined, I knew that in the end I would need the c-section so I wasn't going to put myself or child through that stress. From that point on the nurse would not speak to me.

I thought this would be the end of it but it was not. After the c-section was offered and I was coming to terms with that, my phone rang. It was the doctor who started this whole mess. He sat on the phone and tried to talk me out of the surgery. He tried every tactic he could think of but I was standing strong in my decision. He then decided to come up to the hospital and talk me out of it in person. It did not work.

Finally at 4 pm, 28 hours after I was admitted,I was being preped for surgery. A sense of relief washed over me when I was sitting outside the operating doors that I knew this was over. I learned that day that not everyone will be on your side but if you are truly at peace with your decision you will come out ahead. I also learned that not everyone will be happy with your decisions but if you feel that is what is best in your heart, then you may have to fight.

Jack was born at 5:18pm in 2008. He was born at 36 weeks and 5 days, making him a premie in the eyes of the doctors. If we waited 2 more days he would have been full term. My swelling went down within 2 days of birth and my protein levels were back to normal within the week. Jack had no side effects from the ordeal.

I forgave everyone for the circumstances that led to each event. I know they were trying their best to protect me and my child. I don't like to share this story only because I don't want anyone to be scared of what could happen to them. My case is unique because I could have stopped the "snowball" many times if I only spoke up. I didn't, I trusted blindly and didn't ask questions or communicate my feelings until the end. 

Both Kate and Jill have also shared their birth stories before. They can be found here:
Kate's Olivia and Adriana
Jill's Spring Blessing


Thursday, March 14, 2013

Are 5k races right for me?

If you ever thought of participating in a 5k race but thought that you were too out of shape to do one, I want to be the first to tell you that you can do it.

Last year I decided to participate in the Bay City Saint Patrick's Day 5k. I was sure I would be the last one, people would give the heavy girl dirty looks, spectators would yell insults and so many more things. I signed up as a runner and thought at least I could try to jog a bit. When race day came I noticed I was not alone in my size and everyone was very friendly. I even made a friend by chatting as we were waiting to go. We talked about how we weren't sure we could do this but we were going to try. When we were allowed to go we ran for 30 seconds and then walked. We walked a fast pace and kept talking about different things. There were times I wanted it to be over (around 2 mile mark....) but we kept going. We cheered the runners who were looping around and the streets were lined with spectators who were making everyone feel like a superstar athlete. When I saw the finish line I was determined to at least run over the finish marker. I explained to my new friend we would jog the last block and we really had to push ourselves to make it but did. I was never so happy and proud of myself for finishing something. Sure my legs hurt and all I wanted to do was sit down but I was hooked. My husband and I talked about finding one each month until August. That night I sat down and found a race for each month and registered. I even did a few more when friends would mention them.

So if you are asking if 5k's are right for you, I say yes. I have done them as a way to get out of the house and meet new people. I have done some alone, I have done some as a bonding experience with my siblings and I have done some pushing a double stroller. I don't think you will find a more welcoming group of people than runners/walkers. No one is trying to beat you, they are trying to beat their last time.


A few local races to write on your calendar:
Go The Extra Mile for Conveant Kids - April 14th
Loons Pennant Race - April 20th
Freeland Walleye Fest - April 28th
Midland Dow Run Walk - May 18th
St. Stans June 27th - weather is hot but the homeowners really come out to show support


Monday, March 11, 2013

Everyone is Irish on March 17th!!!!

On March 17th our family becomes as Irish as we can be (even though we are German, Welsh, Hungarian, English and Polish). When Dad is in charge of picking out the clothes we just have one article of green clothing on and it doesn't matter if the rest matches.

 Case in point :
but they are dressed and that is truly what matters. It was one less thing I had to do that day. Besides I am usually in the kitchen early that day getting the corned beef going in the crock pot. We only have this dish one time of year because before I became a mom, I was a cook at a mid-evil style restaurant. Actually I was a waitress, cook, bar tender, hostess, and dishwasher depending on the day. I saw a lot of corned beef and cabbage being served day in and day out so I developed an association to serving and this dish.


The kids are not big fans of the boiled down cabbage and quite frankly, neither am I. So we usually have corned beef with a side of red skin potatoes. This year we are trying to roast the cabbage to see if that makes it taste better. It works for broccoli, cauliflower, brussel sprouts and asparagus so it should work for cabbage. Roasted cabbage recipe.

As for the corned beef, well the instructions are on the package but I find just tossing it in the crock and cooking on low for 6-8 hrs does the trick. There is a spice packet that you can add but most of the time I leave it out. I do add about 1 cup of Guinness to the bottom of the crock to add a bit of flavor. As for the rest of the beer, it is cupcake time!!!

 Irish Cupcakes

Ingredients

For the Cupcakes:
1 cup Guinness stout
1 cup unsalted butter, at room temperature
¾ cup Dutch-process cocoa powder
2 cups all-purpose flour
2 cups granulated sugar
teaspoons baking soda
¾ teaspoons salt
2 eggs
cup sour cream

Directions

1. To Make the Cupcakes: Preheat oven to 350 degrees F. Line 24 cupcake cups with liners. Bring the Guinness and butter to a simmer in a heavy, medium saucepan over medium heat. Add the cocoa powder and whisk until the mixture is smooth. Cool slightly.
2. Whisk the flour, sugar, baking soda and salt in a large bowl to combine. Using an electric mixer, beat the eggs and sour cream on medium speed until combined. Add the Guinness-chocolate mixture to the egg mixture and beat just to combine. Reduce the speed to low, add the flour mixture and beat briefly. Using a rubber spatula, fold the batter until completely combined. Divide the batter among the cupcake liners. Bake until a thin knife inserted into the center comes out clean, about 17 minutes. Cool the cupcakes on a rack.

Now for the boys I make a basic vanilla frosting but for the adults I make a Baileys Irish Cream frosting. I make it different because the frosting isn't cooked so the alcohol content is still there, it is minor, but still present.

For the Baileys Frosting:
2 cups unsalted butter, at room temperature
5 cups powdered sugar
6 tablespoons Baileys Irish Cream


Monday, February 25, 2013

The Easiest (and cheepest) Microwave Popcorn

In the information world we live in, I sometimes assume what I know everyone else knows. I sometimes don't share my tips and tricks that I find every so handy because I am sure you have already heard it. That is the case with making your own microwave popcorn. We are big popcorn people but I could never eat the standard microwave kind. Something about the taste was too much for me. When I was a kid my parents had an air popper and I liked the plain taste of this grain. I did not want to have a bunch of uni-taskers (appliances that only did one thing) so I just felt I could never have popcorn unless I wanted the rich, chemical filled kind that was set for the microwave OR try my hand at it on the stove.

I am not one for the stove with certain things. I have no idea why but I can't make popcorn, caramel or pancakes on the stove. Well I can if you like them a bit blacken. I have worked YEARS in camp kitchens, restaurant kitchens and of course my own but have never mastered the skill of making those items. Maybe it is a patience thing.

Anywho....A few years ago I found how to make popcorn using a simple paper bag. That's right, the only thing that stood in my way of the awesome movie experience was a lunch sack. I have been making it this way ever since. It is more than a movie going treat too. We use it in place of the sandwich in our kids lunches for a great source of grain. It is a very filling low calorie treat as well. You can add a dusting of cinnamon and sugar for a sweet craving or some garlic salt in place of those potato chips.

If you are asking how? Let me show you.

First, get a paper lunch sack and a bag of unpopped popcorn (costs about 1.20 per bag)
 Then get 1/4 a cup of the popcorn and dump in the bag.


Seal up the bag so there is still room for the popcorn to pop up but the top of the bag isn't touching the top of the microwave. Pop for about 2 minutes. If the bag falls over, take it out and you are done. Once it is on it's side it will start to overcook the popcorn and it will burn.


Enjoy!
 
As I said before I like it plain but most people don't. You can melt butter and pour over the top and then add seasonings OR you can use olive or sunflower oil to get some of that healthy fats into your diet. I have mine in a spray bottle with 1 part oil and 3 parts water but I have seen Pampered Chef and Weight Watchers ones that you just add the oil and the work is done for you.

Monday, February 4, 2013

Love, Pizza and Cookies

This past weekend we had a family date and made some pizza. The chefs were ready at the counter to start making their pie and of course make a mess. We used a pre-made crust I found at the grocery store but we have also made our store own crust using this recipe. Gathering up our sauce, cheese and Italian seasoning we were ready to go. The boys don't like topping so we made a cheese pizza, but if you want you can add any toppings you like. Then we set up an assembly line to make sure every one got a turn. 


Chef Jack added the sauce with some help from Daddy.


                                                  Chef Archer adds the cheese.
Chef Hudson does a little shake shake shake to add the seasoning.


      With a few cut up strawberries and a bread stick, Chef Archer enjoys his handy work.


We also made cookies. Oatmeal raisin cookies are not a big hit in our house because my husband does not like raisins, he will eat dried cranberries though. With Valentines Day coming up; the splash of red is a great holiday inspired treat without too much work. Of course making anything into a heart is fun, you can even make a heart pizza if you make your own dough, I wanted to do something that 3 toddlers could all do at one time. With one heart cookie cutter we were sure to have some fights.

                                                         Oatmeal Cranberry Cookies
 makes 2 dozen cookies


1 cup butter, softened
1 cup white sugar
1 cup packed brown sugar
2 eggs
1 teaspoon vanilla extract
2 cups all-purpose flour
1 teaspoon baking soda
1 teaspoon salt
1 1/2 teaspoons ground cinnamon
3 cups quick cooking oats
1 cup dried cranberries
Directions:
1. In a medium bowl, cream together butter, white sugar, and brown sugar. Beat in eggs one at a time, then stir in vanilla. Combine flour, baking soda, salt, and cinnamon; stir into the creamed mixture. Mix in oats. Cover, and chill dough for at least one hour.
2. Preheat the oven to 375 degrees F (190 degrees C). Grease cookie sheets. Roll the dough into walnut sized balls, and place 2 inches apart on cookie sheets. Flatten each cookie with a large fork dipped in sugar.
3. Bake for 8 to 10 minutes in preheated oven. Allow cookies to cool on baking sheet for 5 minutes before transferring to a wire rack to cool completely.

Wednesday, January 23, 2013

Extract!!! Extract!!! read all about it

Do you find yourself reaching for the imitation vanilla extract over the pure vanilla extract at the grocery store? I really can't blame you because the price difference is insane!! Plus really, can the difference in taste be all that different? Well no, the taste may not be all that different but the imitation stuff is just that .....fake. Synthetic chemicals made in a lab by scientists doesn't sound too appealing to me so I try to buy the real stuff when I can, but that can put a big dent in my pocket book when it comes to baking.

Did you know that making your own extracts only takes a bit of time, alcohol and the flavor of your choice? Here are a few recipes on different extracts. If you make them now (or before August), with a bit of cute packaging, you can have some homemade Christmas gifts already done for the baker in your family.

Recipes adapted from Spoonforkbacon.com

(Some) Homemade Extracts
Makes 1 cup each extract
Ingredients:
cinnamon extract:
1 cup brandy
4 cinnamon sticks
vanilla extract:
1 cup brandy (or vodka)
3 vanilla beans, split with the “caviar” scraped out. I ordered this online for the best deal.
orange extract:
1 cup vodka
peel of 5 oranges, ALL pith removed
lemon extract:
1 cup vodka
peel of 5 lemons, ALL pith removed
mint extract:
1 cup vodka
1 cup of mint leaves, crushed

1. For each extract ,sterilize a 16 ounce jar and fill with the cinnamon sticks, vanilla beans or citrus peels.
2. Pour assigned liquor over each jar and tightly seal. Gently shake each jar and set aside in a dark, cool area.
3. Allow mixtures to infuse for at least 2 weeks before, straining and bottling for use. I like mine to sit for at least 4 months to ensure good flavor extraction.
**Gently shake each mixture up every couple of days.

Here is my favorite part.....Once made you can have extracts for years. When you use a bit of the extract, I wait until it is 1/2 gone, add some more liquor and shake. That's it, no more base ingredient needed.

Now these are just some extracts you can make that I know work. If you are feeling a bit daring, try some others like coffee, almond or lime.

If you are worried about the alcohol content, please note that when baking or cooking the "getting you drunk" part is evaporated in the cooking process and you are only left with the flavor. 

Monday, January 14, 2013

Can you be a fruit and veggie ninja?

It can be a challenge to get your kids (or yourself and spouse) to eat the recommended 5 servings of veggies and fruits a day. In our house it has to be done in a somewhat sneaky manner. With a blender or food processor you can make delicious meals that are also nutritious and no one has to know, unless you feel like letting them in on the secret.

I don't always have time to steam or roast veggies, puree and then add to the meal. In order to make sure I have purees on hand; I set aside a day every few months and will make 1 cup blend packs to have in the freezer. Picking up in season fruits and veggies either at the grocery store, farmers market, u-pick farms or my own garden, I then steam or roast the items, blend and place one cup in a labeled freezer bag. I lay them flat in my freezer in groups so they can be found quickly when I need them. I try to get them out the night before to thaw but I can also defrost in the microwave if I forget. 

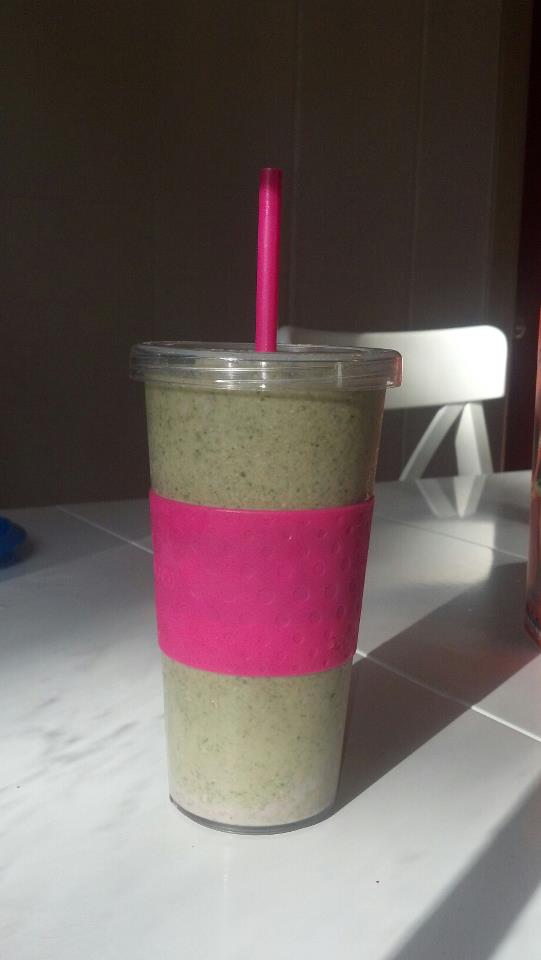
Our easiest way to get a full serving of spinach and fruit is to make a smoothie. We call it the green monster to make it more fun for the boys. My highest recommendation comes from my father who will tell you he HATES vegetables. I gave him a small test of this recipe one day and he had no idea spinach was in it (even though it was completely green). You can add some things like flax, chia seeds and wheat germ to make it even more healthy and no one will know. 

Green Monster Smoothie
1 cup of frozen fruit - I like strawberries but pineapple, bananas, blueberries all work well
1 cup of milk - Soy, Almond, Coconut, Cow all work
3 cups of spinach
Blend smooth and enjoy.

You can also add :
1 TBSP Flax Seed
1 TBSP Wheat Germ
1 TBSP Chia Seeds
Protein Powder
A bit of honey for sweetness 


For some more recipes to try, click on the following links:
carrot cookies
pepper pizza
Sweet Peas Au Gratin
Mac and Cheese (winter squash) 
Carrot Roll Ups 
Baked Zucchini Fries 
Whoopie Pies (Beets) 
Pancakes (sweet potato) 
Sloppy Joe (So many veggies!) 
Homemade Chicken Nuggets (any veggie you like) 

These are great "get you started" recipes but don't be afraid to experiment. Try matching colors (butternut squash and mac and cheese are the same shade of orange), beets and carrots are sweet and go great with dessert, squash can go sweet or savory replacing liquids in many recipes and so much more. Go ahead and be a bit of a ninja in the kitchen, it can be our little secret.


Saturday, January 5, 2013

Celebrating 3,2 and 32 (with some cupcakes)

On my 29th birthday I spent it in the hospital, reciting my information to every doctor and nurse who came in to talk to me. I then had to explain that yes my birthday was indeed THAT day and yes my 2nd son, Archer, would also have that birthday. 

Just before my 30th birthday I had to spend the weeks leading up to January explaining to the doctors and nurses that yes my birthday is January 8th, yes I had a child on January 8th and yes my 3rd son was DUE on January 8th. Little Hudson (well at 9 lbs and 6oz he wasn't that little) was actually born 5 days sooner so he could have his own day but he still celebrates on the 8th.

Over the past few years I have started making cupcakes for parties and other events around town. I have made everything from Mountain Dew cupcakes to a simple chocolate cupcake with great success. Recently a request for black forest cupcakes was made at my husbands work. I honestly had no idea what a black forest cake was and set forth on Pintrest to do some research. I found out that it is basically chocolate cake with some sort of cherry mixture on it. Easy enough to make into cupcake form. I did ask for a poll to be taken about the frosting because I found everything from chocolate frosting to whipped cream frostings to be used. The consensus was to use a chocolate frosting.

I hope you enjoy this cupcake recipe.I sent 18 into work, only keeping 5 for our family. That way I was not tempted to eat more than a serving. These were gone in record time and I am sure will be asked to send more in very soon.


Black Forest Cupcake
Makes around 23 cupcakes 
Ingredients 
  • 1 2/3 C all-purpose flour
  • 2/3 C unsweetened cocoa powder
  • 1 1/2 t baking soda
  • 1 t salt
  • 1/2 C unsalted butter
  • 1 1/2 C white sugar
  • 2 eggs
  • 1 t vanilla extract
  • 1 1/2 C buttermilk
  • Cherry pie filling (AFTER cupcakes are made)
Directions for cakes:

Sift together flour, cocoa powder, baking soda and salt. Set aside.
Cream butter and sugar until light and fluffy.
Beat in eggs and extracts.
Beat in flour mixture, alternating with buttermilk, until combined.
Fill cupcake liners 3/4 full.
Bake at 350 F for eighteen minutes or until cupcakes bounce back when touched.

After letting the cupcakes cool, I punched down the middle with a little tool I have for cupcakes. You can use a paring knife to cut a hole out of the top of each cupcake. Fill each hole with 3-4 cherries and some pie gel. 


Chocolate Frosting

Ingredients 

  • 1/2 C unsalted butter, at room temperature
  • 2 T sweeten condense milk
  • 6 T unsweetened cocoa powder 
  • 2 C powder sugar
  • Dash of milk (for creamy texture)
Directions

Blend butter, cocoa powder and powder sugar in a blender. Slowly add the condensed milk. Once mixed, blend for 1 min. If too thick, add milk to get right texture. *note: I prefer my frosting to be more like a thin fudge. 

You can pipe it on around the cherries or spread over the whole top. It all depends on your love of chocolate. 

ENJOY!!!